Under Sink Filter Shopping Checklist
When shopping for an under-sink filter, measure cabinet height and depth (12–18 in). Leave 2 in clearance for cartridge access so you can change filters without wrenching. Record cartridge overall and usable length, outer diameter, end-cap style, and hose clearance.
Plan for at least two leak sensors near the head and trap; choose battery or hardwired power. Verify IP67+ waterproofing plus app or hub alerts. Keep these details in mind, and you’ll get reliable fit and protection as you continue.
Quick Overview
- Confirm cabinet depth (12–18 in) and at least 2 in clearance behind filter for cartridge access and hose/valve clearance.
- Match filter cartridge overall and usable lengths and outer diameter to housing and manufacturer specs.
- Verify connection/end-cap style, orientation, and required countertop hole (0.5 in for Adapt-a Valve) for installation compatibility.
- Plan leak detection: place 1–3 sensors at filter head, fittings, and under trap. Check power, IP rating, and alert integration.
- Inspect materials, grommets, and warranty for waterproofing and long-term durability. Ensure easy access for routine inspections.
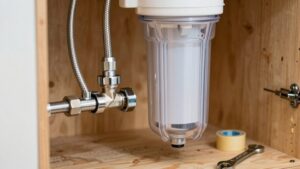
Under-sink Height & Clearance
Wondering whether your cabinet will fit the system you want? You’ll measure under sink height and check clearance constraints first. You should confirm 12–18 inches depth and 2 inches under-filter space for cartridge changes. Consider filter cartridge dimensions when choosing compact vs. full-size units; plan placement coverage for valves, hoses, and leak sensors.
| Item | Minimum | Purpose |
|---|---|---|
| Under-filter space | 2 in | Cartridge access |
| Cabinet depth | 12–18 in | Unit fit |
| Countertop hole | 0.5 in | Adapta Valve |
Review leak sensor compatibility and sensor type compatibility with alert integration options. Verify power source options and waterproofing durability for any electronic sensors. Leave access for routine inspections and tightening.
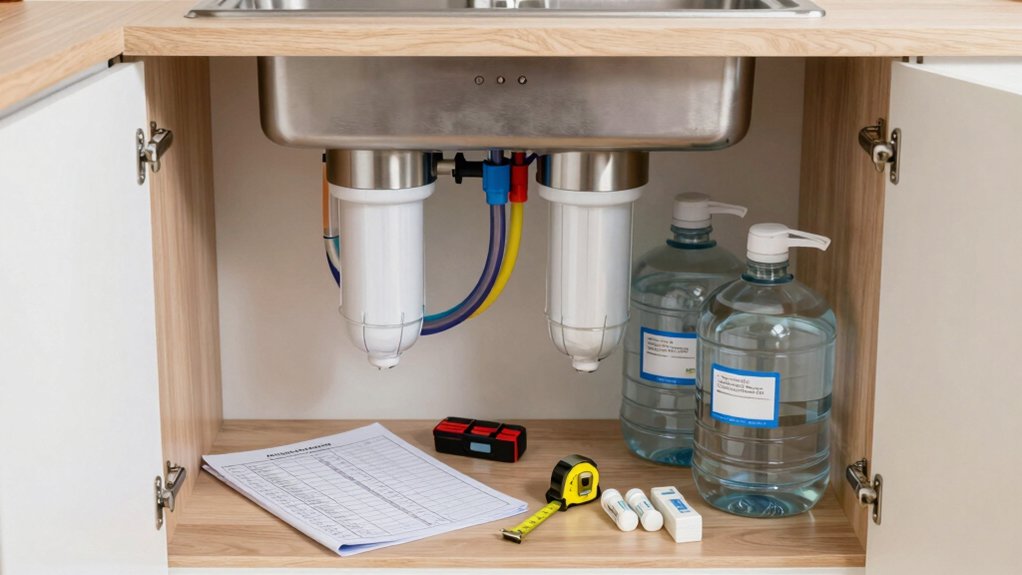
Filter Cartridge Dimensions
How tall and wide your replacement cartridges are will determine not just fit but ease of service and storage. Measure both overall length and usable cartridge length (excluding end caps) before you buy. You’ll check diameter, connection type, and clearance for removal so changes aren’t a struggle. Don’t ignore depth inside the housing; usable cartridge length affects media volume and performance. “Subtopic irrelevant” and “off topic” labels sometimes appear in listings—ignore them if dimensions are clear.
- Exact overall length and usable length (mm/in)
- Outer diameter and required clearances for removal
- Connection/end-cap style and orientation
Record measurements and compare to manufacturer specs. Buy cartridges matching usable length and diameter to avoid performance loss or installation hassle.
Leak Sensor Compatibility
You’ll want to confirm the sensor types your under-sink system accepts (contact probes, float sensors, or wireless pads) and whether they need hardwired or battery power. Check recommended placement to ensure full coverage of vulnerable areas. Verify waterproof ratings and construction for long-term durability.
Also confirm how alerts integrate with your setup: local alarms, smartphone notifications, or smart-home hubs. This way, you’ll get timely warnings where you need them.
Sensor Type Compatibility
Where should you place and pair leak sensors for an under-sink filter? You’ll want sensors at the filter head, near fittings, and under the drain trap. Those points catch the most common failure modes. Match sensor compatibility to your system: wired sensors work with basic alarms, while smart wireless probes need hubs or apps that list your filter model.
Check interface usability so alerts are clear, loud, and actionable. Ensure the app shows sensor location, battery status, and event history. Pairing should be straightforward: follow vendor steps, assign labels, and test each sensor with a small water trigger.
Finally, avoid placing sensors where incidental moisture, like condensation, will cause false positives. Aim for direct-drip locations and stable mounting.
Power Source Options
Which power source fits your leak sensors depends on installation access, desired reliability, and whether you want networked alerts. You’ll choose between hardwired 110–120V feeds, low-voltage adapters, battery-powered units, or PoE/USB options.
Hardwiring gives continuous power and is best if you already have under-sink access and want maximum uptime. Low-voltage transformers reduce shock risk and simplify connection to existing transformers.
Battery-powered sensors offer easy placement and no wiring; however, they require scheduled battery checks. Use high-quality lithium cells for multi-year service. USB or PoE sensors integrate with home networks for push notifications and centralized power; however, expect more installation complexity.
Consider electricity alternatives like long-life batteries or solar for remote setups. Weigh maintenance against reliability and alert needs.
Placement And Coverage
How close should you put leak sensors under the sink to get reliable alerts? Place sensors within 1–3 inches of joints, fittings, and the filter drain line; that proximity catches early drips before they spread. Put at least two sensors: one near the inlet/valve cluster and one under the filter housing or tank.
Position sensors so they sit flat on baseboard or cabinet floor for consistent contact. Consider installation ergonomics: make sensors reachable for testing and battery changes without moving the filter. Route sensor wires or choose wireless units to avoid interference with tubing.
Balance coverage with aesthetic considerations: tuck thin sensors behind plumbing or use low-profile models so monitoring is discreet yet effective; it should not be intrusive to cabinet function.
Alert Integration Options
Why connect leak sensors to your phone, hub, or home automation system? You’ll get immediate alerts so you can shut off water fast and avoid costly damage. When evaluating leak sensor compatibility, check alert integration methods: Wi-Fi, Zigbee, Z-Wave, or proprietary apps.
Prefer sensors that support smart home compatibility with your existing hub (HomeKit, SmartThings, Alexa) to centralize notifications and automated shutoff actions. Confirm battery life, encryption, and range for under-sink placement; metal cabinets and pipes can reduce signal strength. Look for sensors that trigger both local alarms and push notifications.
Additionally, ensure that the sensors offer API or IFTTT support if you need custom workflows. Prioritize models with clear integration docs to simplify setup and diagnostics.
Waterproofing And Durability
Many under-sink leak sensors sit in damp, confined spaces, so you’ll want devices that are explicitly waterproof and built to resist corrosion and drips. Inspect IP ratings (IP67 or higher preferred) and housing materials: stainless steel or marine-grade plastics resist electrolytic corrosion better than cheap alloys.
Check connection points and cable entries for molded seals. Wired sensors need grommets and strain relief. Consider battery compartments and placement so moisture won’t pool against terminals. Evaluate durability aesthetics: choose finishes and compact profiles that won’t clash with cabinetry or impede access.
Verify compatibility with your filtration system’s layout and confirm manufacturer tests for prolonged humidity exposure. Finally, read warranty coverage specifics for water damage and sensor failure so you’re protected if a leak sensor fails.
Frequently Asked Questions
Can It Remove Fluoride or Nitrates Without RO Technology?
Yes, you can get fluoride removal and nitrates reduction without RO technology, but it’s limited. You’ll want specialized media, such as activated alumina or ion-exchange, or multi-stage filters that include those cartridges. They’ll reduce fluoride and nitrates to varying degrees; often without the wastewater of RO.
Check certifications and capacities. Expect periodic media replacement, and know RO still offers the broadest, most reliable reduction for both contaminants.
How Easy Is Filter Replacement for Seniors or Limited Mobility?
You’ll find replacement generally straightforward: direct-connect and cartridge-based multi-stage units offer easy maintenance with twist-off cartridges you can swap in minutes. This is good for rental compatibility since they usually don’t alter plumbing.
RO systems and tankless units can be heavier and need more steps or tools; however, many are DIY-friendly. Pick models with clear guides, quick‑change housings, and long filter intervals to minimize physical strain for seniors or limited mobility.
Does the System Affect Water Pressure for the Whole House?
No, an under-sink system typically won’t affect your whole-house water pressure; its system impact is localized to the cold line feeding that faucet. You’ll see reduced flow at the filtered tap if the filter’s media or an RO membrane restricts output. However, other fixtures keep normal pressure.
If you install whole-house filtration, expect broader system impact on pressure. You may need a booster pump or higher-capacity model.
Are Replacement Cartridges Readily Available Years From Now?
Yes, you can usually count on replacement availability years out, but you should verify brands’ long term compatibility and supply chains before buying.
Choose models with widely sold cartridges, clear part numbers, and NSF-backed manufacturers; they will keep stocks and cross-compatible options. Avoid niche units with proprietary filters or unlabeled parts.
Keep model numbers and buy a spare set early to bridge any short-term supply interruptions.
Can the Unit Be Installed in Mobile Homes or RVS?
Yes, many units install in mobile homes and offer RV compatibility, but you should check specifics. Look for compact, direct-connect or tankless designs that fit tight cabinets and low-clearance hookups.
Confirm inlet/outlet sizes, water pressure requirements, and mounting options. Verify certification and warranty for mobile applications. Ensure replacement cartridges are available for RV schedules. If unsure, choose models explicitly labeled for mobile homes or RV compatibility.
Conclusion
You’ve covered the essentials: measure under-sink height and cartridge size, confirm leak sensor and sensor-type compatibility, and pick a power source that fits your setup.
Decide placement for full coverage and verify alert integrations work with your devices. Don’t ignore waterproofing and overall durability; these prevent surprises.
With these checks, you’ll choose a filter system that fits physically, protects against leaks, and integrates reliably into your home’s power and alert ecosystem.