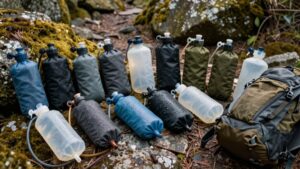
Biofilm in Water Bottles and Hydration Bladders

You should treat water bottles and hydration bladders as likely biofilm reservoirs that need routine cleaning and targeted sanitation. Stainless steel shows lower baseline CFUs than PET. The lid design (direct-mouth vs squeeze-top) strongly affects contamination.
Short dwell times and proper drying limit biofilm. Effective sanitization depends on contact time, temperature, and concentration balanced against material compatibility. Follow daily scrubbing, component washing, and full air-dry procedures to prevent rapid recolonization. More practical guidance follows.
Quick Overview
- Biofilms readily form on internal surfaces of water bottles and hydration bladders, especially with longer water dwell times.
- Bottle material matters: PET typically shows higher baseline bacterial loads than stainless steel.
- Lid and mouthpiece design strongly influence contamination. Direct-mouth and complex straw lids increase risk.
- Regular cleaning (hot water rinse, scrubbing, disassembly, air-dry) prevents biofilm buildup and rapid recolonization.
- Effective sanitation requires appropriate contact time, temperature, and disinfectant compatible with materials to avoid damage.
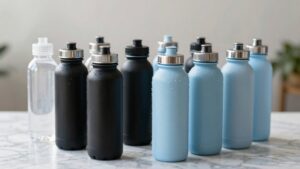
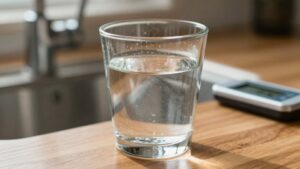
Bacterial Load by Bottle Type
How much difference does bottle type make? You’ll see measurable effects: stainless steel limits bacterial colonization versus PET; with initial CFUs ~35.4 ± 8.2 for SS and 68.8 ± 19.1 for PET. PET showed a 70% higher baseline and faster growth during use. Lid design also drives contamination: direct-mouth and complex straw or screw-top lids elevate loads. Squeeze-top lids minimize transfer.
| Feature | Outcome |
|---|---|
| Material (PET vs SS) | PET ≈2× CFU than SS |
| Short-term use | PET +70% microbial increase |
| Lid: direct mouth | Highest CFU (234 ± 21.3) |
| Lid: squeeze-top | Lowest contamination |
Select stainless steel and simple squeeze-top lids to reduce biofilm risk and bacterial load.
Daily Cleaning Checklist
Material and lid choices can lower baseline bacterial loads; however, daily cleaning is what prevents rapid recolonization and biofilm establishment. You should implement a concise, repeatable protocol for every hydration device to minimize moisture, nutrients, and microbial survival.
Follow this evidence-based checklist each day:
- Rinse reservoir and cap with hot tap water and scrub inner surfaces with a soft brush.
- Wash mouthpiece, straw, and lid components with detergent; flush tubing with soapy water and air-dry inverted.
- Inspect for slimy residue or odor. If detected, repeat cleaning and use a dilute vinegar or baking soda soak.
- Fully air-dry all parts before reassembly; store open to prevent enclosed moisture accumulation.
Consistent daily cleaning reduces biofilm risk and microbial load.
Sanitation Contact Times
When you sanitize bottles and bladders, contact time is a critical control parameter that determines microbial kill more than the specific agent used. Expect effective inactivation to depend on temperature, disinfectant concentration, and material compatibility. Higher temperatures and concentrations shorten required exposure; however, they can damage some plastics or seals.
Also, plan for proper rinse and residual times to remove chemical residues and prevent off-gassing or material degradation.
Recommended Contact Times
Because biofilm protects microorganisms behind a sticky matrix, you must allow disinfectants sufficient contact time to penetrate and inactivate cells rather than relying on brief exposure. Recommended sanitation contact times vary by agent and concentration; typically ranging from several minutes for household bleach solutions (e.g., 1–10 minutes depending on dilution) to longer for milder agents like vinegar or baking soda rinses. Heat-based treatments require exposure at effective temperatures (e.g., near 140°F) for a duration that the manufacturer’s material limits permit. Follow validated guidelines for specific disinfectants and components (hose, bite valve, reservoir) to ensure the entire surface and internal crevices receive adequate exposure.
Use contact times aligned with biofilm formation risk and storage guidelines, documenting procedures. Rinse and dry fully; repeat weekly or after high-risk use.
Temperature Effects On Sanitization
Higher temperatures increase the speed and effectiveness of sanitization by accelerating chemical reactions and disrupting the biofilm matrix, so you should factor heat into contact-time calculations for any chosen disinfectant. You’ll find biofilm thermodynamics predicts reduced activation energy and faster diffusion of biocides at elevated temperatures, shortening required exposure.
Empirical studies show chlorine, hydrogen peroxide, and heat treatments achieve target log reductions more rapidly as temperature rises. This improves sanitation efficacy when contact times are adjusted accordingly. However, thermal limits of materials and disinfectant stability constrain applicable temperatures; validate compatibility with bladder polymers and mouthpieces.
In practice, measure surface temperature, apply manufacturer-recommended maximums, and reduce contact time according to validated data rather than assuming linear gains.
Concentration Versus Time
How long should you let a disinfectant sit to reliably disrupt biofilm in a bottle or bladder? You should balance concentration and contact time because thicker biofilm formation requires higher active-agent exposure. Low-level solutions may reduce planktonic cells quickly but leave extracellular polymeric substances intact. Higher concentrations shorten required contact time but increase material stress.
Empirical studies show that sodium hypochlorite at 50–200 ppm needs 5–30 minutes to achieve significant disruption. Hydrogen peroxide or peracetic acid at manufacturer-recommended doses often require similar windows. You’ll also account for nutrient availability: residues shield microbes and demand longer exposure.
Practically, follow validated product labels. Ensure mechanical agitation or brushing. Maintain contact times at the upper label limit when visible residue or heavy biofilm formation is suspected.
Material Compatibility Times
When you select a disinfectant, match its required contact time to the materials in your bottle or bladder to avoid degradation while still disrupting biofilm. You should consult manufacturer data on material compatibility and documented sanitizer contact times: chlorine, hydrogen peroxide, and quaternary ammonium require different exposures to inactivate biofilm-associated organisms.
Shorter contact times may spare polymers but fail to penetrate extracellular polymeric substances. Longer exposures increase risk of substrate aging, embrittlement, or leaching of additives. Validate protocols experimentally by cycling agents on sample materials and measuring tensile strength, color change, and odor over time.
Record effective minimal contact times that achieve >3-log reduction while preserving material integrity. This evidence-based approach balances microbiological efficacy with longevity of bottles and bladders.
Rinse And Residual Times
Having established material compatibility and required exposure durations, you now need to consider rinse and residual times: the actual contact periods for sanitizers during and after application that determine both microbial kill and polymer safety. You should select a rinse duration that balances efficacy with material tolerance. Short rinses (30–60 seconds) remove bulk residues, while validated contact intervals (often 1–10 minutes depending on agent and biofilm maturity) are required for biocidal action.
Measure residual time to ensure lingering oxidants or disinfectants don’t degrade polymers or leave harmful residues. After the prescribed contact period, perform a controlled rinse to remove byproducts. Document rinse duration and residual time for each sanitizer-material pairing to support repeatable, evidence-based sanitation and reduce biofilm regrowth.
Monitoring Effective Contact
Why does the precise duration of sanitizer contact matter? You must ensure contact time matches the sanitizer’s validated kill-rate for biofilm-associated microbes; shorter exposure often leaves viable cells within the extracellular matrix.
For effective monitoring effectiveness, use timed protocols and chemical test strips to confirm active concentration throughout contact. Measure contact quality by verifying solution distribution: agitate, fill narrow tubing, and soak caps to reach occluded surfaces. Record start and end times, solution temperature, and sanitizer ppm; these parameters alter log-reduction rates.
After treatment, neutralize residual sanitizer and perform ATP swabbing or culture sampling at high-risk sites to confirm efficacy. Repeat interventions if ATP or colony counts exceed thresholds; adjust dwell times based on empirical results.
Frequently Asked Questions
How Quickly Does Biofilm Begin Forming Inside a New Bottle?
Biofilm formation can begin within hours to days. You’ll often see initial adhesion within 4–24 hours; mature layers form over 48–72 hours. The evidence-based time frame depends on moisture, temperature, residues, and surface porosity.
Warmer, nutrient-rich conditions accelerate development; dry, clean surfaces delay it. To minimize risk, you should wash and fully dry bottles after each use. Additionally, perform weekly deep cleaning to disrupt early biofilm establishment.
Can Biofilm Cause Long-Term Health Problems?
Yes, biofilm health risks can include recurrent infections and chronic inflammation, especially in immunocompromised people. You will face persistent microbial reservoirs that resist disinfectants and antibiotics; this raises long-term implications like recurring gastroenteritis or wound colonization if exposed repeatedly.
Evidence-based control focuses on mechanical removal, regular disinfection, and drying to prevent resistant communities. Monitor vulnerable users and eliminate niches where biofilm can re-establish to reduce risks.
Are Certain Plastics More Prone to Biofilm Than Others?
Yes, different plastic resins vary in biofilm susceptibility. You’ll find softer, more porous resins (like some polyethylene blends) support greater microbial adhesion than harder resins (HDPE, PET).
Surface roughness, hydrophobicity, and additives affect attachment. You should increase cleaning frequency for prone resins and use targeted methods (brushes, hot water, periodic disinfectant).
Monitor wear and replace degraded bottles, since scratches and aging raise colonization risk.
Can UV Sterilizers Fully Remove Biofilm From Bladders?
No, UV sterilizers can’t fully remove biofilm from bladders. You’ll disrupt surface microbes; however, biofilm chemistry (EPS matrix, depth, and heterogeneity) shields embedded cells, reducing UV penetration.
UV sterilizer limits include shadowing, insufficient dose, and turbulent flow that prevents uniform exposure. For reliable control, combine mechanical scrubbing, chemical disinfectants, or heat with UV. Do not rely on UV alone for established biofilm removal.
No, you shouldn’t share mouthpieces or nozzles. Sharing increases contamination risk. Evidence shows direct contact transfers microbes and can seed biofilm inside reservoirs; this raises pathogen load.
If sharing is unavoidable, disinfect mouthpieces between users with appropriate sanitizers. Fully dry components and use disposable tips. Routine cleaning and avoiding sugary residues reduce microbial survival. Implementing these controls minimizes, but doesn’t eliminate, the contamination risk.
Conclusion
You’ve seen that bottle and bladder designs, materials, and temperatures considerably affect biofilm formation and removal. Prioritize routine cleaning, validated sanitizers, and contact times matched to concentration and material compatibility. Use hot water when allowed. Record dwell times, and monitor residuals or ATP where available to confirm effectiveness.
With consistent, evidence-based practices—daily cleaning, periodic deep sanitation, and documentation—you’ll minimize bacterial load and maintain safe, usable hydration systems.