How Push to Connect Fittings Work for Water Lines
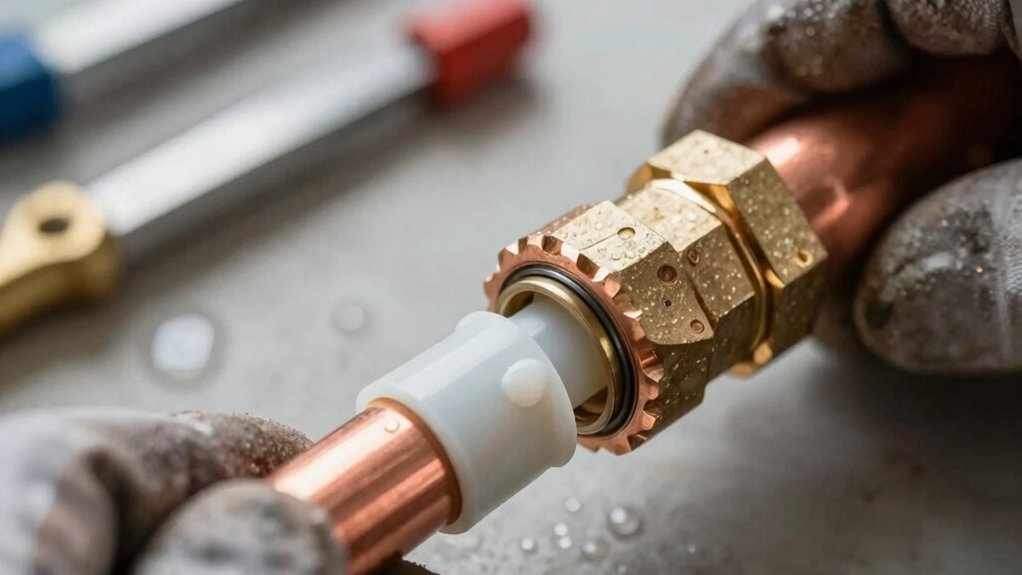
You push the pipe into the fitting until your mark hits the release collar, where an O‑ring and metal grab ring create a sealed, mechanical hold. Verify full engagement visually or with a gauge.
Check the fitting’s max PSI and temperature for the seal material. Use dielectric sleeves or PTFE liners to prevent metal‑to‑metal contact and galvanic corrosion where dissimilar metals meet.
Follow bonding and local code requirements. Inspect periodically and continue for installation details and limits.
Quick Overview
- Push-to-connect fittings use an internal collet with metal teeth that grip pipe while an O-ring seals around the pipe for a leakproof connection.
- Insert pipe to the specified depth: the mark should rest against the release collar to ensure full engagement and reliable sealing.
- Cut pipe square, deburr, and confirm clean outer diameter to prevent O-ring damage and ensure proper collet bite.
- Verify compatibility with pipe material, temperature, and maximum working pressure. Account for spikes and thermal cycling.
- For dissimilar metals, use dielectric isolation (PTFE/PEEK/nylon sleeves or dielectric unions) and follow bonding and inspection codes.
Push-to-Connect O-ring Sizes
How deep should the pipe enter a push-to-connect fitting for a reliable O-ring seal? You must insert the pipe to the specified depth so the mark rests against the release collar; that compresses the O-ring and prevents leaks.
Don’t get distracted by irrelevant discussion or go off topic about tools.
| Fitting Size | Insertion Depth | Notes |
|---|---|---|
| 1/2″ | 7/8″ (22 mm) | Standard for many fittings |
| 3/4″ | 1-1/8″ (28 mm) | Ensures O-ring compression |
| 1″ | 1-5/16″ (33 mm) | Full engagement required |
| 1-1/4″ | 1-1/2″ (38 mm) | Stiffener needed for PEX |
| 3/8″ | Varies | Use chart for exact OD |
Verify visually and with gauges. Full insertion equals reliable seal.
Max PSI and Temp Limits
When you select push-to-connect fittings for water lines, check both the maximum working pressure and temperature ratings specified by the manufacturer, because those limits depend on material, size, and design. You’ll use those specs to avoid overstressing O-rings, collets, and bodies.
- Confirm max psi for the specific plastic or metal fitting variant.
- Verify temp limits for EPDM or alternative seal compounds at operating duty.
- Account for transient pressure spikes and thermal cycling in system design.
- Avoid mating incompatible belting connections or adapters that reduce rating.
- Use manufacturer tables for size-specific derating factors and service life.
Follow rated limits strictly. Exceeding max psi or temp limits accelerates seal wear, risks pullout, and voids warranties.
Dielectric Isolation Requirements
When you specify push-to-connect fittings, confirm dielectric isolation to prevent metal-to-metal contact between dissimilar metals. Use appropriate insulators (plastic sleeves, dielectric unions, or PTFE tape) and assess galvanic corrosion risk where copper, brass, stainless, or steel meet.
Also verify bonding/grounding requirements and applicable codes. This ensures isolation won’t interfere with electrical continuity or violate standards.
Metal-To-Metal Separation
Why should you care about metal-to-metal separation in push-to-connect water fittings? You must prevent galvanic corrosion where dissimilar metals meet. Controlled metal separation reduces electrochemical current paths. Design tolerances keep metals apart while allowing the tube to seat.
You’ll rely on gasket behavior to maintain an electrical break without compromising the seal: resilient O-rings compress to seal fluids but shouldn’t bridge metallic surfaces. Inspect seating depth and mating faces; any exposed metal contact can bypass dielectric isolation. In installations with mixed metals, implement specified separation gaps and verify that metal-to-metal contact points are interrupted by non-conductive barriers integrated into the fitting body.
Maintenance checks should confirm continued isolation. Corrosion or deformation can reestablish conductive paths over time.
Insulating Materials Used
Having established the need to prevent metal-to-metal contact, specify insulating materials that provide dielectric isolation while withstanding the mechanical and chemical demands of water-line fittings. You should choose polymers like PTFE, PEEK, and reinforced nylon for dielectric isolation; they resist common disinfectants and maintain dimensional stability under pressure.
Use thin PTFE liners where low friction and chemical inertness matter. PEEK is suitable for higher temperature or mechanical load. Reinforced nylon offers cost-effective insulation with acceptable thermal resistance and decent abrasion strength.
Consider elastomeric sleeves (EPDM or silicone) for localized cushioning and insulation aesthetics where visible joints matter. Select materials compatible with potable water, verify compression set, and confirm long-term creep under expected clamp loads so dielectric function persists without compromising seal integrity.
Galvanic Corrosion Risks
Galvanic corrosion can quietly compromise mixed-metal water-line assemblies, so you need dielectric isolation where dissimilar metals contact or are electrically coupled through conductive water. You should identify potential galvanic coupling between fitting bodies, tubing materials, and nearby brass, copper, or stainless components.
Use non-conductive sleeves, dielectric unions, or polymer-lined fittings to interrupt electrical paths and prevent anodic attack. Inspect joint designs for exposed metal overlap and specify materials with close electrochemical potentials when isolation isn’t practical. Maintain protective coatings and replace damaged insulation immediately. Microscopic breaches concentrate corrosion risk.
For installations in aggressive water chemistries, monitor for early signs: pitting, increased conductivity, or staining. Implement isolation retrofits before leaks develop.
Bonding And Grounding Needs
You’ve already seen how galvanic currents can start corrosion at mixed-metal joints. Now consider how bonding and grounding—or deliberately breaking electrical continuity—control those currents. When you install push-to-connect fittings, assess bonding considerations: determine whether the fitting must maintain electrical continuity across a joint or be isolated to prevent a stray current path.
Use dielectric unions or non-conductive sleeves where isolation is required. For fittings that serve as part of an equipment grounding path, verify grounding practices that ensure low-resistance connection. Use approved clamps or conductors attached to metallic bodies downstream of non-conductive components.
Inspect contact surfaces, avoid paint or debris at clamp points, and document continuity measurements. These steps minimize galvanic attack without relying on code citations. They focus on practical electrical isolation and continuity control.
Code And Standard Requirements
Why must you consider dielectric isolation when installing push-to-connect fittings? You’ll need to prevent stray currents and galvanic corrosion where dissimilar metals meet. Codes and standards require dielectric fittings or insulating sleeves between copper, brass, and steel to maintain electrical continuity and potable water safety.
Follow local plumbing code, NSF/ANSI 61 for drinking-water materials, and electrical bonding rules that may mandate bonding around isolating devices. Document compliance, using listed dielectric unions or approved insulating inserts sized to the tubing. Don’t treat this as an afterthought or mix with unrelated topics like speculative fantasy design choices; the requirement is functional and verifiable.
Inspectors expect evidence of approved materials and installation methods that preserve system integrity and prevent metal deterioration.
Inspection And Maintenance
How often should you inspect dielectric isolation on push-to-connect fittings? You should inspect at installation and then at scheduled maintenance intervals, typically every 6–12 months or sooner after modifications or corrosion signs.
Check insulation compatibility between fitting materials and adjacent metal to prevent galvanic corrosion. Verify that any insulating sleeves or dielectric unions are intact and properly seated. Use color coding on insulation or tags to identify protected versus unprotected joints quickly.
During inspection, look for wear, cracks, displaced sleeves, or electrolyte deposits. Test continuity where applicable to confirm isolation. Replace compromised components immediately and document findings.
Tighten procedure controls so dielectric isolation stays effective, reducing leak and corrosion risk while preserving O-ring and collet function.
Frequently Asked Questions
Can Push-To-Connect Fittings Be Used With Potable Water Systems?
Yes, you can use Push to Connect fittings for potable water if they meet Plumbing Safety and Commercial Standards. You’ll want fittings and tubing rated for drinking water (NSF/ANSI or equivalent). Install tubing with square cuts and fully seat it; verify there are no leaks.
Follow manufacturer max pressure/temperature limits and local code. For commercial or high-use systems, choose metal-bodied, certified fittings and document compliance during inspections.
How Often Should the O-Ring Be Inspected or Replaced?
Inspect O-rings every 6–12 months and replace seals every 1–3 years depending on duty and exposure. If you have outdoor installation, inspect quarterly for UV, freezing, or debris damage. Replace seals immediately if you see cracking, flattening, or leaks.
During routine maintenance, clean tube ends and lubricate O-rings with compatible grease. Keep records of inspections and replacements to predict wear and ensure long-term weather resistance.
Do Push-To-Connect Fittings Affect Water Taste or Odor?
Generally no, push-to-connect fittings rarely affect water taste or odor if you perform taste testing and follow installation tips. You’ll ensure material compatibility (food-grade plastics or brass) and clean, square cuts to avoid debris.
Replace aged O-rings and flush lines after installation. Monitor for odor changes during initial use. Proper selection and installation prevent leaching or microbial traps that could alter sensory quality.
Can They Be Used Outdoors Exposed to Sunlight?
You can use them outdoors, but check sunlight resistance ratings and material specs first. UV degrades many plastic fittings and O-rings, so choose UV-stabilized plastics or metal-bodied fittings with EPDM or UV-rated seals for prolonged outdoor exposure.
Install with UV barriers, shading, or conduit where possible. Inspect seals periodically for cracking. For critical lines, prefer metal options or specified UV-resistant push-to-connect models to ensure long-term reliability.
Are These Fittings Compatible With PEX, Copper, and PVC Tubing?
Yes, push-to-connect fittings compatibility includes PEX, copper, and many PVC types, provided tubing OD matches the fitting. You’ll ensure full insertion depth, clean square cuts, and smooth surfaces for reliable seals.
Consider material durability: plastic fittings resist corrosion, but UV can degrade them. Metal options improve longevity under vibration and sunlight. Verify manufacturer specs for PVC solvent-welded or schedule-rated pipes and maximum pressure ratings before use.
Conclusion
You’ve seen how push-to-connect fittings rely on properly sized O-rings, pressure and temperature limits, and dielectric isolation to prevent metal-to-metal contact and galvanic corrosion. Use approved insulating materials, follow bonding and grounding requirements, and heed code limits for PSI, temp, and separation.
Inspect seals and insulation regularly. Replace worn components, and document maintenance. Doing so keeps water lines safe, electrically isolated where required, and compliant with standards.
You may also like: Reverse Osmosis Faucet Installation Overview — a related guide worth bookmarking.